| Level 2: Lunar Scilab |
Coriolanus: "I had rather have one scratch my head i' the sun when the alarum were struck than idly sit to hear my nothings monster'd." - Coriolanus, Act II, Scene 2 |
This level is an excellent place to practice circling skills. Many of the rooms are swarming with enemies, and is a good test of your ablilty to circle and destroy opponents. No new enemies are introduced in this level.

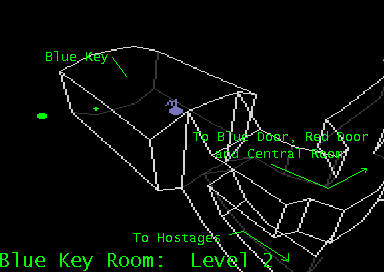
The blue key is guarded by two Small Hulks, two Class 2 Drones, and two Class 1 Drones. This room is perfect for circling, since it is spacious. Circling will get every enemy except one Class 2 Drone. In addition, there are two shield powerups next to the key. Use the corridors leading to the room as a cover, and take the enemies out at long range.
The lone Class 2 Drone is usually located in a corner. You will probably take that out last.
The hostages may be accessed through the room via the corridor indicated. The hostages are guarded by two Class 2 Drones and two Class 1 Drones. It is recommended that you take them out from within the corridor.
You must return to the central room to access the blue door.
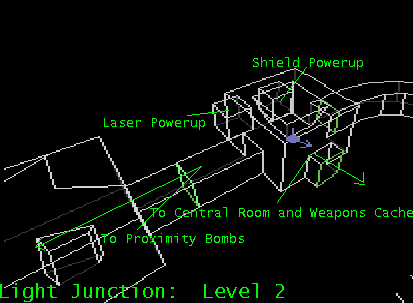
I call this room the light junction because there is a light assembly coming down from the ceiling coming halfway down to the floor, making navigation slightly more difficult around this room. I am devoting some attention to this room because you can get valuable weapons in and near this room. This room is guarded by two Class 1 Drones. You will have to lure them out into the doorway and take them out at long range.
There is a laser powerup and a shield powerup in secret rooms in this junction. You can also obtain your first proximity bombs by going into the door indicated. That room is guarded by two Class 1 Drones.
The Weapons Cache will be mentioned in the next section, as it requires an explanation of its own.
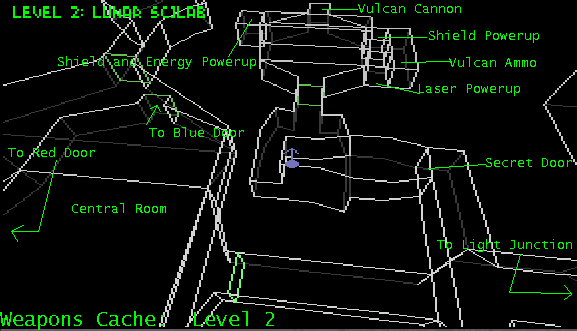
This is biggest collection of weapons and powerups in this level. It may be accessed my the Light Junction or the central room. You must first take out all the enemies in the room leading to the Weapons Cache. Then, go to the end of the corridor indicated and open the secret door. Destroy the two Class 2 Drones in the chamber and then open the door to the Weapons Cache.
There are many Shield and Weapons powerups, a laser powerup, and a Vulcan cannon and ammo. The cache is guarded by several Small Hulks and four Class 2 Drones lurking inside the chambers with the powerups. You should take out the Small Hulks and any Class 2 Drones that you see from outside the room and take out all the Class 2 Drones lurking inside the weapon chambers before taking all the weapons.
Before entering the blue door, you will encounter two Class 1 Drones. Use your concussion missiles to take out the Drones while using the corner as a cover.
Upon entering the blue door, you will face opposition almost immediately. The shaft is guarded by two Class 2 Drones and one Class 1 Drone. The Class 1 Drone will be at the top and will appear when the blue door is opened. Destroy it and use your Vulcan Cannon and Concussion Missiles to destroy the drones as you go down the shaft.
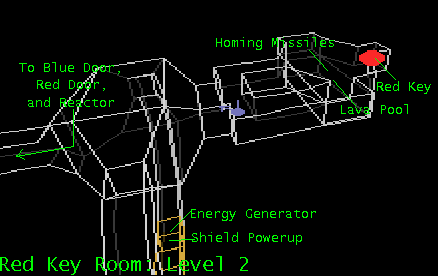
When you reach bottom, you will encounter another swarm of enemies. Immediately move forward and slide left and right to prevent being trapped. If you are low on energy and shields, then go down one of the tunnels leading to the energy generators. Take out the Class 1 Drone inside the energy generator. Keep going until you reach the other side and all the enemies will be opposite from you with their backs toward you. Take them out from that position.
The red key is located inside a niche bordering a lava pool. It is guarded by three Small Hulks and one Class 2 Drone. There is a shield powerup and a pack of homing missiles on the surface of the lava pool. Destroy all enemies in this area before taking the items. You should use the corridors leading to the room as cover.
You must return from the way you came in order to access the red door.
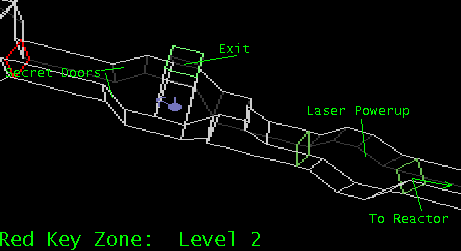
Note the position of the exit. This particular exit is a commonly missed exit, since it is located on the ceiling.
There are two secret doors near the exit that you cannot open. These doors are hiding two Small Hulks with a shield powerup. The two doors will open when you blow the reactor. You shouldn't lay proximity bombs near those doors...they will detonate before the reactor blows.
There is a laser powerup indicated in the diagram.
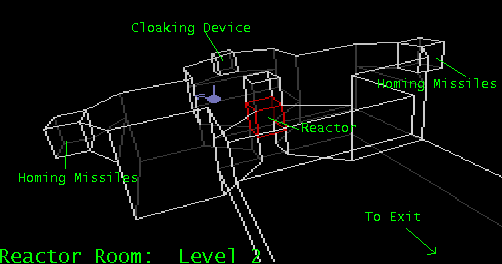
The reactor is guarded by six Small Hulks. You must take them out before attempting to blow the reactor. One Small Hulk will be right in front of you to your left. Take it out at long range.
Next, approach the reactor but do not attack it yet. You should see the rest of the Small Hulks. Take them out one by one, using the ledge behind the reactor as cover.
There are three secret rooms in the reactor room. Two of them lead to homing missiles. The rear leads to a cloaking device. DO NOT TAKE THE CLOAKING DEVICE YET. Blow the reactor as quickly as possible.
When the reactor blows, go to the back room and take the cloaking device. Head for the exit and destroy the Small Hulks that have been released if desired, then go to the exit.
| Previous Level - Level 1: Lunar Outpost | Current Level - Level 2: Lunar Scilab | Next Level - Level 3: Lunar Military Base |
|---|---|---|
 |  |  |