| Level 3: Lunar Military Base | Richard: "Why dost thou spit on
me?"
Anne: "Would it were mortal poison, for thy sake!" - Richard III, Act I, Scene 2 |
The difficulty has gone up. This level is moderately complex at this stage of the game, and one must use the automap to avoid being lost. This level is the first to have robot generators and Medium Hulks. Caution is advised when attempting this level.
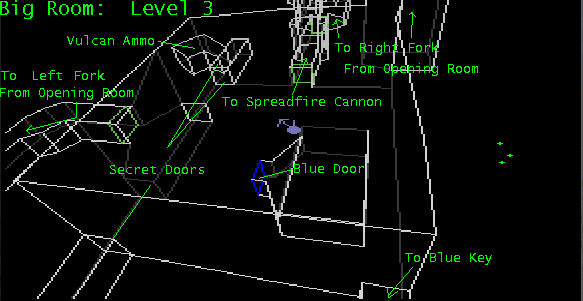
This room is one of the main junctions of the level. This room is guarded by several Small Hulks and several Class 1 and Class 2 Drones. You may want to circle the room or take them out at long range so that the enemies become easier targets.
As indicated by the map, there are several secret areas. Each contains valuable powerups...but one of them contains a Class 2 Drone....
To reach the Blue Key and your first Spreadfire Cannon, access the corridors indicated on the map.
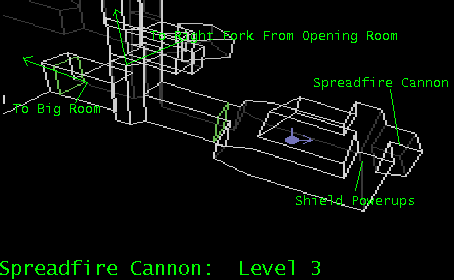
This is the first level which you can get a Spreadfire Cannon. It may be accessed by the Big Room. However, it is guarded by four Class 2 Drones. You can either attempt to get the Cannon first or destroy the enemies first.
If you are low on shields, you may want to destroy the enemies first. You should be able to take all the drones out from the outside or from the corner inside the room using concussion missiles.
If you have enough shields, you can grab the cannon and destroy the enemies on the way out. The Spreadfire Cannon can destroy drones faster than lasers, and may get you out with a mininum expenditure of energy.
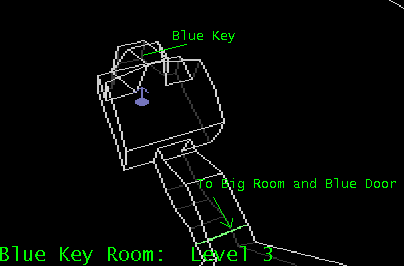
This room contains the blue key, which is located in a niche indicated on the map. At the beginning, be aware of the steep grade of the corridor leading to the key, and the enemies will undoubtly have released some shots. It is guarded by several Class 2 Drones. Destroying some of the drones will give you shield powerups.
The antechamber before this room is heavily guarded. It is guarded by several Class 2 Drones and Class 1 Drones. You should destroy them all, preferably from long range, before heading for the blue key.
You will have to return from the way you came to the Big Room to access the blue door.
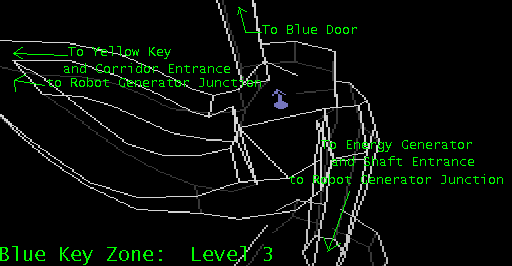
Upon entering the blue door, you will face opposition almost immediately. The shaft is guarded by two Class 2 Drones and two Class 1 Drones. Bank the ship until you are vertical. Open the door and use your concussion missiles to take one of the Class 1 Drones from the corner. Then, destroy the rest as you go down the shaft with concussion missiles and your vulcan cannon.
When you reach bottom, you will encounter another swarm of enemies. The defense is made up of three Small Hulks, several Class 2 Drones and several Class 1 drones. Be sure that you destroy them all if you want to return to this area to access the Robot Generator Junction(discussed later).
Take any one of the two corridors indicated to reach the yellow key. You will know when you have reached the branch leading to the yellow key when you encounter two Class 2 Drones attacking you, since they usually stay around that branch. KEEP YOUR EYES OPEN since this branch is easily overlooked.
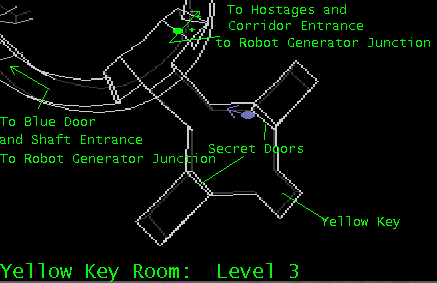
When you enter the room, be wary of the two secret doors that are indicated. This room is a trap. Each door leads to a secret chamber containing one Class 2 Drone each. You cannot open the secret doors directly. Find the secret doors and lay proximity mines in front of them.
Once you grab the key, however, the doors will immediately open, releasing the Drones. Just get out of the room...the proximity mines will take care of the Drones.
After destroying the drones, enter the secret chambers. One chamber has a pack of homing missiles, and the other has a pack of proximity bombs.
You will have to go through the Robot Generator Junction in order to reach the yellow door. You may either head back to the main room and take the shaft down or you may go to your right and enter through a corridor and rescuing the hostages on the way. For beginners, it is recommended that you take the corridor entrance, since it is safer. The entrance through the shaft will lead you right in front of a...
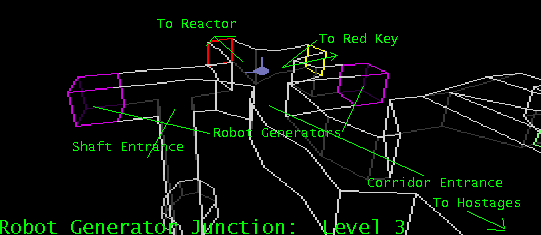
...robot generator. Once you enter this junction, the robot generators will immediately activate. If you are entering by the corridor(rescuing the hostages on the way), you can either make a mad dash for the yellow door or fight the Class 1 Drones emerging from the generators. On Ace dissiculty level, just make a mad dash, laying proximity bombs along the way.
If you are entering by the shaft, you MUST fight them off. By the time you get in, the generators will have produced enough robots to sandwich you. You may want to attack the robots coming from the generator closest to you. If you are playing at Ace difficulty level, DO NOT ENTER FROM THE SHAFT, UNLESS YOU HAVE A TON OF LIVES TO WASTE.

The red key is located behind the wall in front of the exit. It is guarded by several Class 2 Drones and a Small Hulk. Destroy them before taking the key. Lay some proximity mines as you go in.
Take note of the three secret doors indicated. This room is a trap when you blow the reactor. Inside are two Small Hulks at the sides and a Medium Hulk in the middle. It is useless to drop proximity bombs, since it is almost impossible to blow the reactor in time.
Once you leave this room to go to the red door, the robot generators outside will reactivate. You may choose either to head for the red door or destroy the drones emerging from the generators before heading for the reactor.
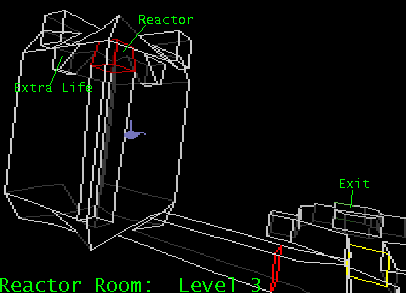
The reactor is guarded by four Small Hulks and a Medium Hulk. This room is shaped in a way that hinders circling, especially around the top. Take out the Small Hulks from the bottom by aiming your nose up and aiming, using the corridor from which you entered as cover.
When destroyed, the Medium Hulk will release an Extra Life. The Medium Hulk will usually hover around the reactor. Take him out from the middle of the room with your nose still pointing up, while strafing
The reactor is located on top of the pillar which ends near the top of the room. Go up a bit farther until you can barely see the reactor. When the reactor edge is in your sights, take it out!
Once the reactor blows, you will have to go QUICKLY to the exit. If you have enough time, you may want to destroy the Hulks in the trap, but is not recommended. You could have to slide while going at full acceleration to get out in time and evade the Hulks.
| Previous Level - Level 2: Lunar Scilab | Current Level - Level 3: Lunar Military Base | Next Level - Level 4: Venus Atmospheric Lab |
|---|---|---|