| Level 1: Lunar Outpost |
|
This level is an excellent introduction to the game. As implied by the level number, it is a simple level, and may be used as a warmup for the later levels.
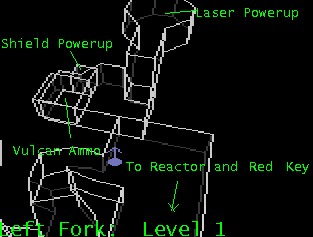
If you go down the left fork from the opening room, you will come upon this area. This is an excellent weapons cache for later use. Be forewarned that it is guarded on the outside by two Class 1 Drones and two Class 2 drones. To defeat them, remain in the tunnel in the ceiling and go straight down to the room. When you hear their weapons, immediately back up into the ceiling hole and the enemies will be in your sights. Take them out from your position.
There is a secret door leading to the weapons cache. The cache is guarded by a Class 1 Drone and a Class 2 Drone. Inside the weapons cache are two secret doors, one leading to a shield powerup, one leading to a Small Hulk that possesses a laser powerup. Open the secret door from the other side of the room and take out the Class 1 Drone from afar, then take out the Class 2 Drone from the doorway. Then, open the secret door in the ceiling and take out the Small Hulk from the corridor.
Also located in this region is a set of shield and energy powerups. It is located in a side passage abutting the reactor.
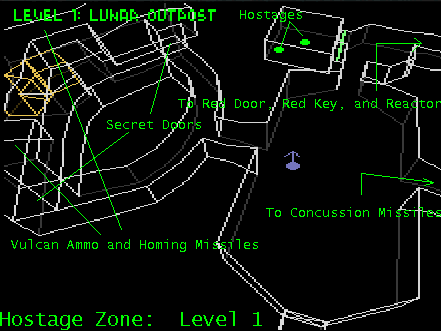
Located in this area are the hostages. The room leading to the hostage door is guarded by a Class 1 Drone and a Class 2 Drone.
Also located in this area is the energy generator room. This area is guarded by two Class 1 drones and two Class 2 Drones. There are two secret doors leading to a room containing Vulcan Ammo and a pack of homing missiles.
Near this area is a corridor leading to a pack of concussion missiles guarded by three Class 1 Drones. It is suggested that you take them out from the corridor entrance.
You will have to exit this area from the corridor which you entered in order to access the red key and the reactor.

Before entering the red key room, you will encounter resistance from several Class 1 Drones and two Class 2 Drones. Make sure that you take them out before attacking the red key room.
The red key is located on a podium. It is guarded by two Small Hulks and one Class 2 Drones. You should take them out from outside the room before attempting to take the key.
Located within this room is a obscure corridor containing a Shield and Energy Powerup. If you want to attempt to obtain these two items, be aware that you will have to navigate a low corridor with a lava floor.
A Vulcan cannon is located nearby this area. When leaving the room, go down to the lower corridor and go down a hole in the floor. It will be guarded by a Small Hulk(seems like every good weapon here is guarded by Small Hulks....).
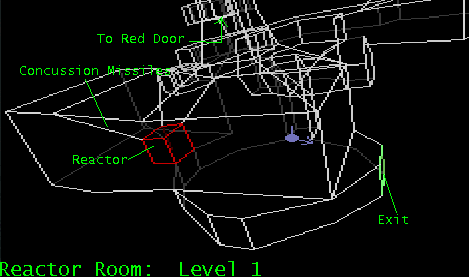
On approaching the reactor room from the red door, you will encounter a Class 2 Drone and three Class 1 Drones. Destroy the Class 2 Drone in the front first, then destroy the Class 1 Drones by opening the red door, luring the Drones out, exiting the red door, and taking the drones out from the outside.
The reactor is guarded by three Small Hulks and one Class 2 Drone. Stay in the shaft and take out the two Small Hulks in front of the reactor and then take out the Class 1 Drone to the right. Then, enter the reactor room and take out the Small Hulk in front of the exit.
Located behind the reactor is a pack of concussion missiles. When attacking the reactor, you should circle the reactor while firing. It should blow up within 10 direct hits.
| Previous Level - Secret Level 3: Asteroid Robot Factory | Current Level - Level 1: Lunar Outpost | Next Level - Level 2: Lunar Scilab |
|---|---|---|