|
Secret Level 1: Asteroid Secret Base |
Juliet: O, bid me leap,
rather than marry Paris, from off the battlements of yonder tower, or walk
in thievish ways, or bid me lurk where serpents are; chain me with roaring
bears, or shut me nightly in a charnel house, o'ercover'd quite with dead
men's rattling bones, with reeky shanks and yellow chapless skulls; or
bid me go into a new-made grave and hide me with a dead man in his shroud-things
that, to hear them told, have made me tremble-and I will do it without
fear or doubt, to live an unstain'd wife to my sweet love.
Romeo and Juliet, Act IV, Scene 1 |
This secret level is the secret level with the moderate difficulty. This level contains mainly Drillers, Fusion Hulks, Platform Robots. and a occasion Defense Robot.
The key to getting out of the level with a minimal expenditure of lives depends on the ability to get the yellow and red keys.

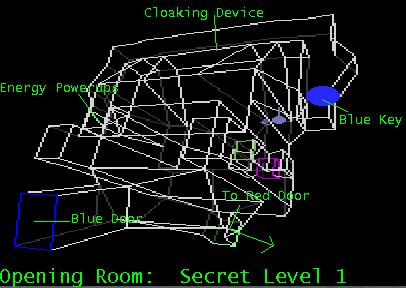
The opening room is where you will immediately grab the blue key. When you first enter the level, you will grab three shield powerups located in the entrance. Switch to your plasma or your vulcan cannon and open the door. You will see a fusion hulk ahead of you. Take out the fusion hulk and slide if fires any shots, but do not leave the entrance chamber. Once the fusion hulk is destroyed, enter the opening room and take out the two defense robots located by the fans. After they are destroyed, grab the blue key and the energy powerups if you are low on energy.
There is a cloaking device located in the duct as indicated. It is your choice whether you take it or not. I do not take it-I leave it for the reactor room.
After grabbing the blue key, go down to the lower level and take out the Grey Platform Robots located there, then head for the blue door.
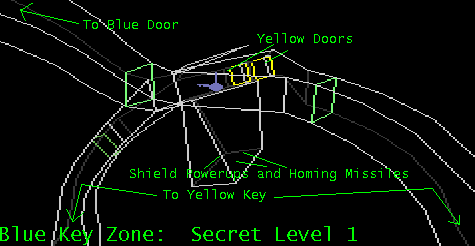
After entering the blue door and going down the resulting passageway, you will come upon this room. It is guarded by two Green Platform Robots and two Gray Platform Robots. It is suggested that you take out the Green Platform Robots located by the yellow doors first.
Then, take out the Gray Platform Robots guarding the passageways to the side. Once you have destroyed all the enemies, you may go down either side passage.
If you are low on shields, you may want to take the shield powerups located in the lava pit indicated.
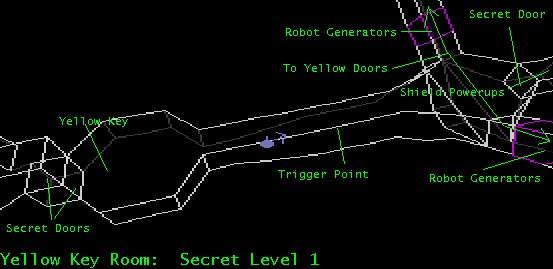
Once you go down the side passages, you will come about a robot generator. It will currently be off. Continue until you are under attack by the Defense Robots lurking in the junction between the generators. Take out all the Defense Robots.
Once you have taken out the defense robot, lay a proximity mine in front of the secret door in the junction. Then head BACKWARDS toward the trigger point, keeping in sight of the mine. When you pass the trigger point, the secret door will open, revealing a Fusion Hulk. Immediately charge up and attack the Fusion Hulk and destroy it. You will have a chance in the passageway since the proximity mine will stop its first shot. Pick up the shield powerups in the secret room.
You will have to take out the three Fusion Hulks guarding the key. First, fire a smart missile into the floor of the room in which the key is located. DO NOT FIRE IT AGAINST THE SECRET DOOR. Then enter the chamber, and back out. This will expose two of the Fusion Hulks. Take out both of them as quickly as possible.
Then, open the secret door behind the key and immediately slide away when the door opens. A Fusion Hulk will manifest itself. Destroy it as quickly as possible.
Inside the room in which the latter Fusion Hulk was located is another secret door in the ceiling. Open it and you can pick up a collection of smart missiles, mega missiles, and an extra life.
Grab the key and go out by the way you came. Once you pass the trigger point, the robot generators will activate. Take the passageway to the right, since the robot generator there produces Gray Platform Robots. If you are foolhardy, you can take the left and face some Green Platform Robots...:-)
After entering the yellow doors, you will come upon two passageways in the ground. Go in them if you want to gain access to the hostages.
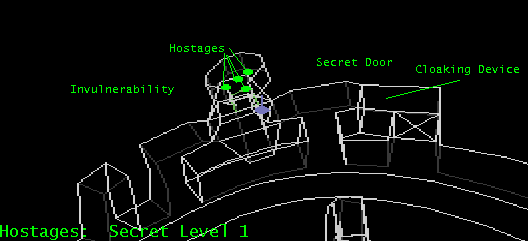
After destroying the enemies in the passageways and grabbing the weapons powerups in this area, you will come to this area, the hostage area. This area is guarded by two cloaked Class 1 Drillers at both entrances. They will usually drop cloaking devices when destroyed. Destroy them, but DO NOT TAKE THE CLOAKING DEVICES. Rescue the hostages next.
When you rescue the hostages, you will pick up an invulnerability along the way. When you do so, pick up both cloaking devices dropped by the drillers and optionally the cloaking device indicated in the secret room. Immediately head back to the passageways in which you entered the hostage area and go into the door and the end of the junction...

You must enter this area with both invulnerability and cloaking. If you do not, it becomes almost impossible to escape this area without a massive loss of lives and hostages. This warning applies even at the Trainee level.
This room reminds me of a scene in Gone With The Wind. Rhett Butler had to go through an inferno to get Scarlett O'Hara, Melanie Wilkes, and the children and servants out of Atlanta. This area is very similar...
After you enter the door indcated previously, you will enter an extremely dark room. There are two robot generators to the sides and a fusion cannon far across the room. Using the fusion cannon as a beacon, go quickly across the room and go down the shaft at the fusion cannon.
This shaft leads to the red key room. You have two choices on getting the red key:
This was simple so far. You must leave this area from the way you came. This means that you will have to go through the big dark room again. This time, you most likely do not have any cloaking or invulnerability left. The dark room is guarded by an unknown amount of Fusion Hulks, cloaked Class 1 Drillers, and Defense Robots. If you were able to get in with the cloaking device, you should have almost no problems getting out.
However, if you entered the room without a cloaking device or if your cloaking device ran out before you were able to reach the shaft, you are in for a long and miserable fight out. The enemies will be ganging on the shaft entrance, and there will be so many, that you will have a hard time escaping....
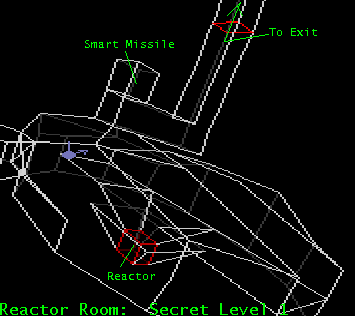
Once you get out of the nightmare described previously, head back to the blue door. Go through it and enter the opening room and pick up the cloaking device, if you did not pick it up previously. Quickly go through the plain door indicated on the map and enter through the red door.
The reactor room is guarded by three Fusion Hulks and three Small Hulks. Take out all Hulks before destroying the reactor.
If you are short one smart missile, there is a smart missile located in a secret room indicated on the map.
The reactor is wedged in a depression and a protruding wall. This makes the reactor slightly difficult to attack against.
Once you blow up the reactor, find the way that you came from and go back through it to the blue door.
 |
After entering the blue door, there will be a junction which
you may have previously discovered. The secret door indicated will open,
revealing three Supervisor Robots. One contains an Extra Life, another
contains mega missiles, and another contains Green Platform robots. If
you have enough time, destroy them and grab the items.
Across from this secret door is the exit. After you get out, take a break. You just blew through a fairly difficult level at this point in the game. |
| Previous Level - Level 27: Charon Volatile Mine | Current Level - Secret Level 1: Asteroid Secret Base | Next Level - Secret Level 2: Asteroid Storage Depot |
|---|---|---|