| Level 6: Mercury
Solar Lab |
Autolycus: "My traffic is sheets; when the kite builds,
look to lesser linen. My father nam'd me Autolycus; who, being, I as am,
litter'd under Mercury, was likewise a snapper-up of unconsidered trifles."
The Winter's Tale, Act IV, Scene 3
|
Introduction:
The difficulty has just gone up a notch. This level is the first to
have Class 1 Drillers and Spider Processing Robots. If you saved up on
your homing missiles, then it will pay off in this level. The briefing
was right when they said that there was "heavy" infestation in this level.
Warnings:
-
The Red Key Room is one of the most dangerous traps in the game. Just be
careful in that room if you are low on shields or on lives.
-
Only use your homing missiles on the Class 1 Drillers...don't use them
anywhere else in the level.
Robot Generator Room
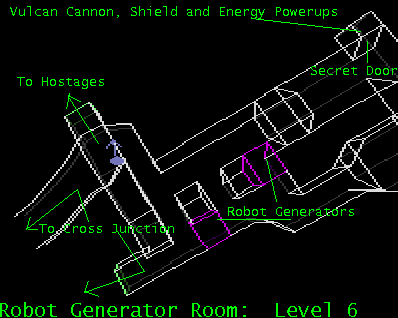 |
This is considered the opening room. There are two robot
generators in this room creating Class 1 Drones. Although the drones themselves
are not considered dangerous, they could pose a problem if you are surrounded. Let
the generators activate, and take out the drones from outside the room.
The hostages may be accessed through a ramp and a door indicated on
the map.
You will have to enter Cross Junction to proceed through the level. |
Cross Junction
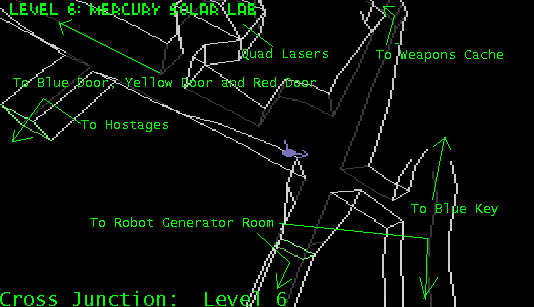
I call this room Cross Junction because it is in the shape of a cross.
This is the main junction which you will have to cross to get to all vital
areas of the mine.
As indicated on the map, there is an alternate route to the room with
the hostages. However, it is much more dangerous since it is guarded by
two Class 2 Drillers, and one of them always seems to be camouflaged in
a corner...it almost looks cloaked...
Also indicated is a room with a quad laser powerup, if you were unable
to get the powerup in level 5. However, this quad laser powerup is guarded
by a Class 1 Driller and a Medium Hulk.
You can gain access to a very rich weapons cache by accessing the corridor
indicated on the map.
To obtain the blue key, follow the corridor indicated on the map.
Hostage Room
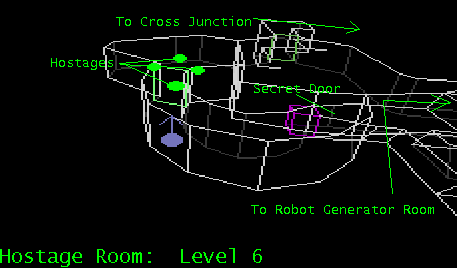
This hostage room is guarded by two Spider Processing Robots. Destroy
them before attempting to rescue the hostages.
The hostages are locked in by a grate...how does one rescue them?
To rescue them, you must fire at the wall at the point indicated on
the map. A secret door will open, which will lead you to the hostage cell
door.
You may want to return by the way in which you came if you entered from
the Robot Generator Room. The hidden driller also seems to be hidden when
you approach from the other side as well.
Weapons Cache
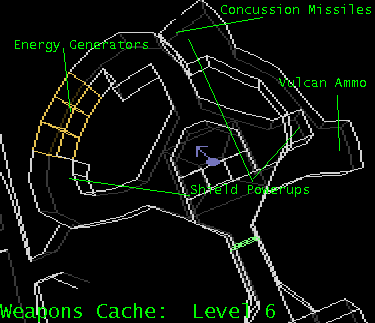
This weapons cache is guarded mainly by Class 1 Drillers(here's where
saving up on homing missiles really benefits you) and an occasional Class
1 Drone, Class 2 Drone or Medium Hulk. Just destroy them as you go along,
picking up the various items. Use your homing missiles sparingly...there
are almost as much drillers here as your capacity of homing missiles.
This area is divided into two layers. The energy generator is on the
top layer, while your entrance is from the bottom layer.
This area has a energy generator, many shield powerups, vulcan ammo
and tons of concussion missiles. This area also contains several laser
powerups.
Blue Key Room
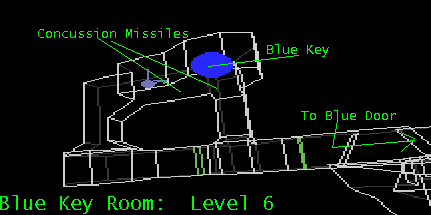
The Blue key is guarded by two Medium Hulks, one Spider Processing Robot,
and several Class 2 Drones. All enemies should be destroyed before obtaining
the key. You must attack the enemies indirectly to avoid taking damage from the blast radiuses.
Before entering the room, there is a Class 1 Driller located in a chamber
across this area. It should be destroyed before it becomes more than a
minor nuisance.
You will have to return to Cross Junction to access the Blue Door.
Junction
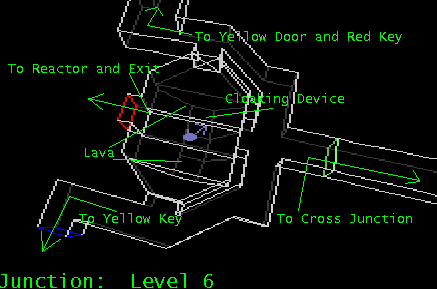
I don't know what this area reminds me of...:-(
This area is guarded by several Class 1 Drillers and a Spider Processing
Robot. You may not be able to use homing missiles in here due to the tightness
of the space here. Be sure you destroy all enemies in this area before
entering any of the doors, since you will return here later.
The lava pit under the bridge hides a cloaking device, a shield powerup,
and a pack of proximity mines. Do not pick any of those powerups yet...you
will need them later.
All three colored doors may be accessed via this area.
Yellow Key Room
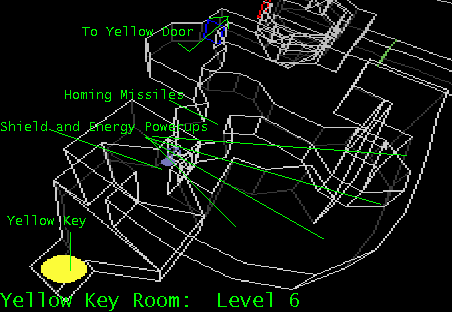
There is only one way to the yellow key(the apparent shortcut is not
a shortcut) and you will have to destroy every enemy in this room to get
it. This room is guarded by a Spider Processing Robot, Class 2 Drones,
three Class 1 Drillers, and three Medium Hulks. You will have to destroy
them as fast as possible to prevent yourself from being a target for the
Class 1 Drillers.
This room also has a great number of shield and energy powerups and
homing missiles. Their locations are indicated in the map.
Once you grab the yellow key from the niche, you will need to check
if you have enough shields to grab the red key. If you do not have enough(you
need about 50% shields), you may have to lose a life in the next room.
Red Key Room
(Thanks to David Worthington for telling me how to get past this
room.)
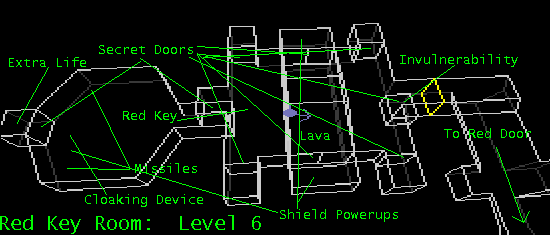
You will need at least 50% shields to pass this room. If you do
not, you may lose a life in this room.
This room is one of the worst traps in the whole game. It is extremely
deceptive that the key should be hanging around isolated with no one guarding
it. However, it is EXTREMELY well guarded.
Once you go over the lava pool, the secret doors will immediately open,
releasing six Class 1 Drillers and two Class 1 Drones on all sides. You
will probably lose at least 30% of your shields before you realize that
it is a trap and another 20% to get out of the room.
The secret to passing the room is a invulnerability powerup located
in the floor of the entry corridor. It will not open unless you go over
the lava pool. Locate two secret doors at the sides of the room on your side of the lava pool and drop proximity bombs in front of the doors.
Next, drop two proximity bombs on either side of you on your side of the lava pool while turning around towards the red door. Once you have done this, go over the lava pool between the proximity bombs.
Once you go over the lava pool and you hear the doors open, get back to the entry corridor
and pick up the invulnerability. Then, just attack all the enemies with
your lasers as quickly as possible.
If you are unable to destroy them all by the time the invulnerability
runs out, go to the other end of the corridor and shoot the floor. A secret
door should open, leading you to a cache of weapons with a cloaking device.
Behind the cloaking device is a secret door leading to an Extra Life orb.
Reactor Room
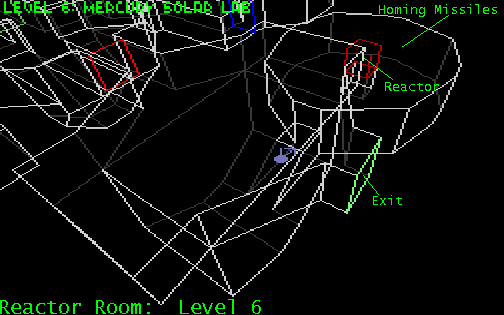
Return to the junction and grab the three powerups located in the lava
pit. Then, immediately go into the red door.
Note the position of the exit.
The reactor is guarded by two Class 1 Drillers and three Super Hulks.
Use homing missiles to destroy the drillers.
When you reach the area in which the reactor is housed, you have two
choices. You may either attempt to destroy the reactor with your current
weapons, or you may attempt to destroy the reactor from outside the room.
If you choose to destroy the Super Hulks first, you will have to do
it QUICKLY before the cloaking device that you picked up in the lava pool
runs out. If it does run out before you can destroy them, get out of the
room and destroy the reactor from outside the room.
Once you destroy the reactor, if you left any Super Hulk untouched,
you will have to slide and accelerate to the exit, since the room is big
enough for a homing missile's turning radius.
| Previous Level - Level 5: Venus Nickel-Iron
Mine |
Current Level - Level 6: Mercury Solar Lab |
Next Level - Level 7: Mercury Core |
 |
 |
 |