| Level 5: Venus
Nickel-Iron Mine |
Portia: "The quality of mercy is not strain'd;
it droppeth as the gentle rain from heaven upon the place beneath. It is
twice blest...."
Merchant of Venice, Act IV, Scene 1
|
Introduction:
This level is your first introduction to corridor fighting, since that
is all you will ever do in this level. This level contains Class 1 Drones,
Class 2 Drones, Small Hulks, Medium Hulks, and Medium Lifters and one Super
Hulk. This level is also fairly complex, so it is suggested that you use
the automap often.
Warnings:
- Note that there are two cloaked robots. They will be Medium Lifters.
You must destroy them or else they will hunt you down all over the level(as
in level 4).
- Note the distance of the exit from the reactor room...it is fairly
distant.
- This level is the first level to contain a Super Hulk.
Opening Junction
 |
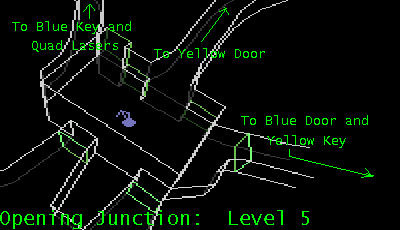
The three passageways indicated on the map are the only
ones you will need in this level to access the keys and the doors. The
other two corridors not indicated are superfluous corridors which you may
try if you feel like bashing some more enemies.
This junction is guarded by several Class 2 Drones and a Medium Lifter. They should be taken out before entering the junction.
|
Blue Key Room
 |
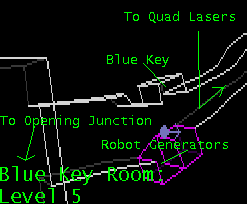
This key is located in a niche across a robot generator. Once you pass
through the area, the generator will immediately activate, forming Small
Hulks and Medium Lifters. You can easily get a bundle of points just by
destroying them.
When the generators stop, grab the key.
As indicated, the quad lasers are also in this corridor. It is guarded
by the Super Hulk, which you will have to destroy to grab the powerup.
To make it easy, right outside the blue key room from the Opening Junction is a secret door(not shown on map) that contains a cloaking device.
|
Yellow Key Room

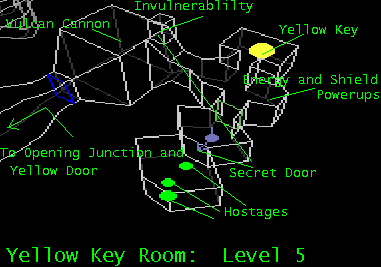
This key is guarded by a large amount ot Class 1 Drones, Class 2 Drones,
and Medium Lifters, including a cloaked lifter. Your quad lasers won't
take them out fast enough. What do you do?
The answer is simple....Located behind a secret door is an invulnerablility
powerup. It will give you enough time to take out all the enemies and allow
you to get out unscathed.
Note the abundance of weapons powerups in this room.
The hostages are also located here. It may look deceiving when you blow
the hostage cell door and you find nothing, but fire at the grey wall and
you will see the hostages in an adjoining room.
Head back to the opening room for the yellow door.
Weapons Cache

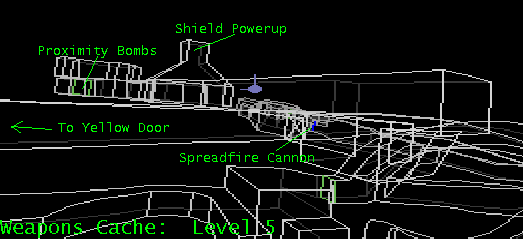
This is a very obscure weapons cache, since it is so easily missed.
it is located in the corridor leading to the yellow door as indicated on
the map. Find a grate to your left and start looking up. You should see
a hole in the ceiling. Go through it and access the huge variety of weapons
and shield and energy powerups in this area.
This cache, however, is guarded by several Medium Lifters and a occasional
Class 1 Drone.
This cache also contains a Spreadfire Cannon(if you haven't grabbed
it by now).
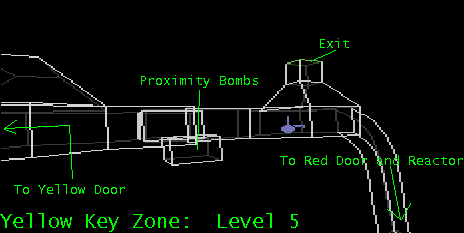
Yellow Key Zone

The antechamber containing the yellow door is guarded by a Class 2 Drone
and the other cloaked Medium Lifter. Destroy them before entering this
area.
Once you enter the area, you will be under immediate attack by Class
1 Drones and Class 2 Drones. It is suggested that you destroy them from the outside of the room.
There is also some proximity bombs guarded by two Medium Lifters in
a lava pool.
Note the position of the exit. As in level 4, this exit is fairly distant
from the reactor. Destroy the Medium Hulk lurking around the corridor ahead.
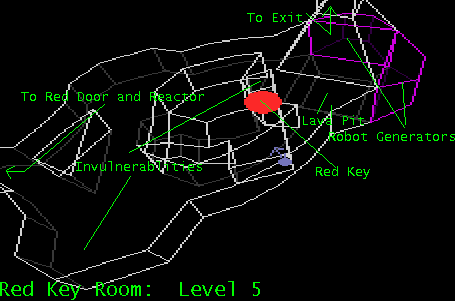
Red Key Room

The red key is guarded by two robot generators producing a indeterminate
number of Medium Lifters and Super Hulks. The generators will immediately
activate when you enter the room. In addition, there are several Class
2 Drones and Medium Lifters lurking around the corridors. The best way to defeat this area is to go down, force the generators to activate, and take out everybody from the shaft going into the room. DO NOT use
any of the invulnerablilities in this level yet.
One of the invulnerablilties is located within a secret door located
in a small labyrinth of rooms.
Once the generators have shut off and all enemies destroyed, grab the
key and one invulnerability and head for the red door and the reactor room.
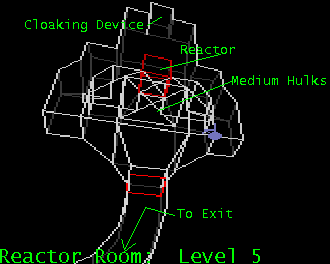
Reactor Room

The reactor is located on a pedestal. Note the cloaking device behind
the reactor.
There is a sealed small room with four Medium Hulks. They will attack
you once you enter the room and when you are attacking the reactor. Since
you picked up the invulnerability, just destroy them through the grating.
When the Medium Hulks are destroyed, immediately begin attacking the
reactor. You may pick up the cloaking device if your invulnerability runs
out.
Once you destroy the reactor, immediately head out to the exit. Don't
waste your time attempting to pick up another invulnerability...they don't
help you in cases of reactor meltdowns.
| Previous Level - Level 4: Venus Atmospheric
Lab |
Current Level - Level 5: Venus Nickel-Iron
Mine |
Next Level - Level 6: Mercury Solar Lab |
 |
 |
 |
