| Level 25: Pluto Outpost | Brutus: "Art thou some god, some angel,
or some devil that makest my blood cold and my hair to stare? Speak to
me what thou art."
Ghost of Caesar: "Thy evil spirit, Brutus." Brutus: "Why comest thou?" Ghost of Caesar: "To tell thee thou shalt see me at Philippi." Brutus: "Well, then I shall see thee again?" Ghost of Caesar: "Ay, at Philippi." Julius Caesar, Act IV, Scene 3
|
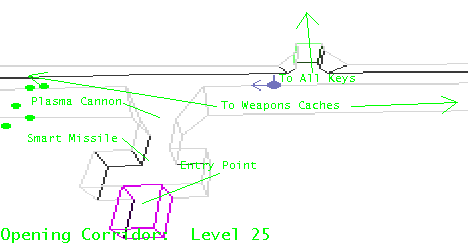
The briefing says that plasma weapons will become readily available. I think the weapons have gone to enemy hands...:-( This level is a haven for Class 1 Heavy Drillers, Defense Robots, and Green Platform Robots. You will have the advantage of a plasma cannon and a smart missile at the beginning.
Enter the level and pick up the smart missile and the plasma cannon. Then, peep around the right corner and find the Class 1 Heavy Driller guarding the door. Once it is in your sights, destroy it using the plasma cannon and duck back into the corridor in which you entered the level.
Next, go back out into the corridor and destroy the Green Platform Robots and Class 1 Drillers from each side. Take them out at long range...it is a straight corridor all the way down...you don't have to worry about enemies around the corner.
At each end of the corridor is a weapons cache guarded by Green Platform Robots and Defense Robots. If you are able to defeat the enemies at long range, each cache is worth it....
To access the blue key, enter the door indicated.
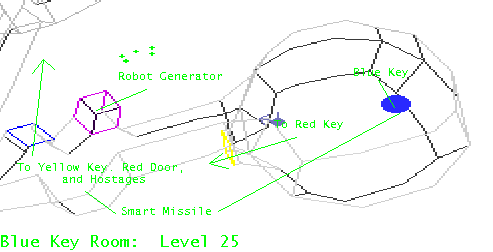
After you enter the door, move forward and face to your right. Take out the Defense Robot in the niche. Then, turn around and face the robot generator. By this time, the generator will activate, forming Class 1 Heavy Drillers. Destroy them as they come out, and when the generator deactivates, face the blue key. Take out the Class 1 Heavy Drillers in the room at long range(you may want to use a smart missile to assist you in luring them out), and then you are free to grab the key.
Go back the way you came in and find the blue door to the right. The
robot generator may activate again; if it does, take out the enemies as
they come in.
Enter the blue door and go down the passageway. You will encounter a Class 1 Heavy Driller, which should be take out. Once you approach a brightly lit area, be careful as there are two Class 1 Heavy Drillers ohiding in ambush as soon as you enter their sights. Cautiously enter and lure them away from their hiding places, and take them out.
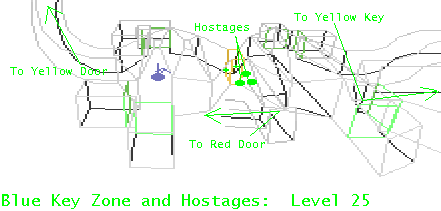
In this area, there are several side doors containing powerups of every sort. There is an invulnerability and a cloaking device in these side doors. Save them for when you enter the red door, which is located in this area.
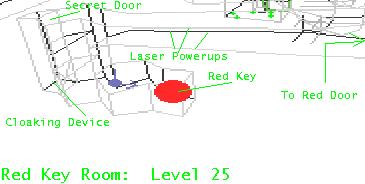
The hostages are also located around this area...they are located right above the red door. Do not rescue the hostages yet.
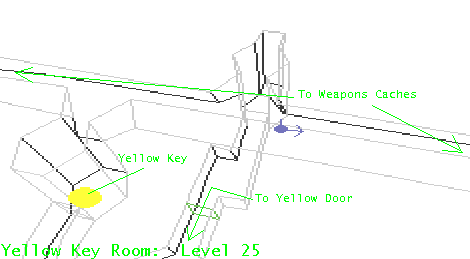
To access the yellow key, access the side door that is indicated on the map.
After opening the side door, take out the Green Platform Robot and enter through the door ahead. Next, take out the Green Platform Robot and the two Defense Robots in the room which you enter. Then, go up the shaft into the corridor.
This corridor is like the opening corridor...it is guarded on both sides by Class 1 Heavy Drillers and Green Platform Robots. You can also take them out from long range from where you are standing.
The yellow key is located in a shaft adjoining the corridor, as indicated on the map. It will not be guarded. Just take it and return to the corridor.
On both sides of the corridor are weapons caches. They also connect to another corridor similar to this one. If you want to try for these weapons, just be careful that you don't get lost.
To access the yellow door, you will have to return to the blue key room and look under the passageway that you entered.
Once you enter the yellow door, you will come under immediate attack by Green Platform Robots and Defense Robots. You will be able to take them out at long range from the yellow door. There is also a Class 1 Heavy Driller lurking at the bottom of the shaft leading to the key. Destroy all the enemies and you will have a clear path to the key.
You will need to enter the blue doors to access the red door.
Once you reach the area with the red door, go down to the red door and destroy the Defense Robot there. Next, find the cloaking device in the side doors and enter the red door. Stay at the top level and take out all the robots at the top level. Then, when all the robots in the top level have been destroyed, take the invulnerability in the side room and use it to take out the robots in the lower level of the room(the level shown on the map).
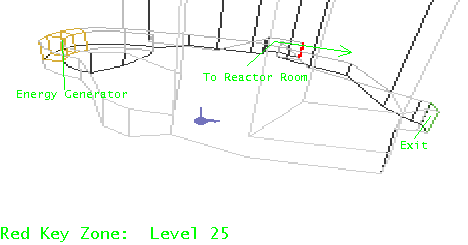
Note the location of the exit in relation to the corridor to the red door. This area is not well lit and you will need to find the exit, which is not adequately lit.
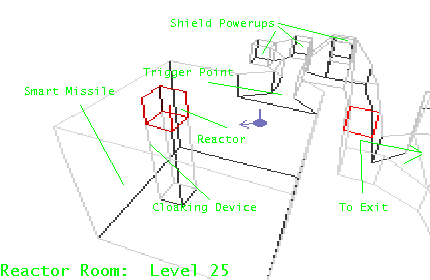
Enter the red door and find the three secret doors that cannot be opened. Lay a proximity mine in front of each door. Then, when you see the wall of the reactor room, turn around and back up to the trigger point. The doors will open, revealing Class 1 Heavy Drillers. Since you turned around, one of the drillers will be in front of you. Destroy all three drillers and pick up the shield powerups.
Next, go back to the trigger point and carefully turn around the right corner. You should be able to take out the two Green Platform Robots, the two Class 1 Heavy Drillers, and the Defense Robot guarding the reactor. Once you have destroyed them, return to the hostage area and rescue the hostages.
Take the smart missile and the cloaking device, blow the reactor, and quickly head for the exit.
| Previous Level - Level 24: Nereid Volatile Mine | Current Level - Level 25: Pluto Outpost | Next Level - Level 26: Pluto Military Base |
|---|---|---|