| Level 18: Miranda Mine |
Miranda: "...therefore wast thou deservedly confin'd into this rock, who hadst deserv'd more than a prison." - The Tempest, Act I, Scene 2 |
If you can pick off gray platform robots very easily, then this level is for you. This level is easier than the last 4 or 5 previous levels. The level is fairly simple and can be interesting to anybody. However, if you don't have sliding skills, prepare yourself for a fight.

The blue key is located in a room abutting the junction. It is guarded by a Medium Hulk, which you should take out before attempting to get the key.
There are two secret chambers located beside the podium in which the key is located. Both chambers contain a smart missile(don't use it in this level, though...)
You will have to reenter the central room to get to the blue door, which may be reached via a door in the central room or an opening located in the center of the central room. It is suggested that you take the door, since the opening route is guarded by a Class 1 Heavy Driller(yes, the plasma spewing robot).

The yellow key is located within the blue doors. It is guarded by two Medium Hulks. Before you enter the room containing the key, you must fight through several other enemies, though. You will meet at least two Class 1 Drillers, several Secondary Lifters, two Gray Platform Robots, and another Medium Hulk.
The hostages are located in a room across the yellow key.
In the passage connecting the room with the key and the hostages, there is a secret passage located in the ceiling. However, the passage only contains vulcan cannons and ammo(which you do not need in this level).
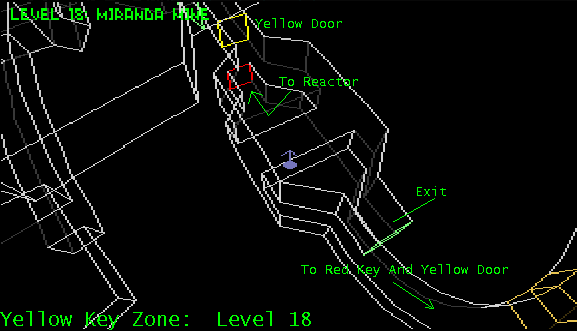
To get to the yellow door, you will have to reenter the central room. They may be reached via a door in the central room or by the junction that you reached in order to obtain the blue key.

Note the position of the exit. This exit may be easily mistaken for any other normal corridor when attempting escape from the mine. This map is for people who used the central room door to access the yellow door.
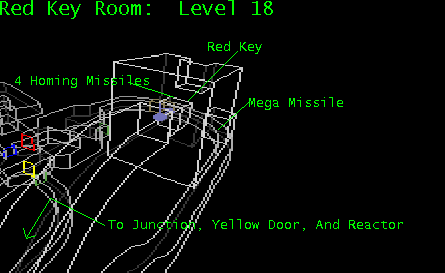
To reach the red key from this point, go down the corridor indicated until you reach the other yellow door. There should be a junction with a corridor going down. This will lead you to the red key.

After going down the corridor that was previously described, you will come to a room very similar to the room that contained the blue key. This room is guarded by two Medium Hulks that should be destroyed before getting the key.
There are two secret rooms located on each side of the podium containing the red key. One room contains a mega missile, the other a 4-pack of homing missiles.
When heading for the reactor, it is suggested that you relocate the exit due to the reasons described above.

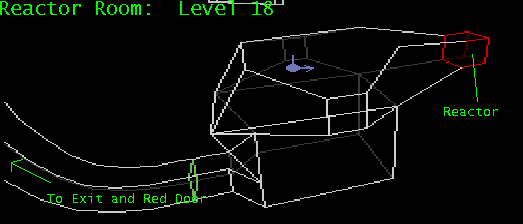
When you enter the reactor room, do not attack the reactor directly. There will be a number of Secondary Lifters, one Advanced Lifter, and a Super Hulk. Begin circling the enemies and start shooting. Ignore any homing indicators-the missiles won't hit you. Keep circling until all Lifters are destroyed. Take out the Super Hulk last.
When you have taken out all the enemies, attack the reactor, which is located in a niche. This reactor should be fairly easy to take out. Once you blow up the reactor, IMMEDIATELY HEAD BACK since the exit is fairly distant.
| Previous Level - Level 17: Tethys H2O Mine | Current Level - Level 18: Miranda Mine | Next Level - Level 19: Oberon Mine |
|---|---|---|
 |  |  |