| Level 9: Mars
Military Dig |
Armado: "The armipotent Mars, of lances the almighty,
gave Hector a gift-"
Dumaine: "A gilt nutmeg."
Berowne: "A lemon."
Longaville: "Stuck with cloves."
Dumaine: "No, cloven."
Love's Labour Lost, Act V, Scene 2
|
Introduction:
Boy, Mars did give these robots a gift. They gave them the gift of aggression
and all these weapons we thought were safe from them....
This level is fairly complex, but the key is your automap and whether
you are in lava. If you are in lava, you're at least in the right spot
for the doors and the keys.
Warnings:
- Most of your fighting will occur in corridors or in confined spaces.
Just be careful when attacking enemies.
Opening Room
 |
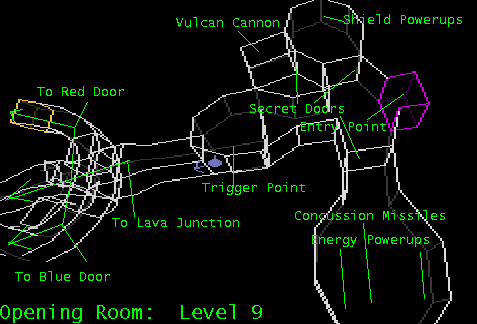
The opening room has two doors that you cannot initially
open. You will have to put your ship over the indicated trigger point. Before doing so, drop some mines in front of the doors.
These doors hide a weapons cache. It is guarded by a great amount of
Secondary Lifters, Spider Processing Robots, and Class 1 Drones.
Branching from the opening room are four corridors. You may start with
any one of these corridors, but you will have to go into some lava to get
the blue key.
|
Lava Junction

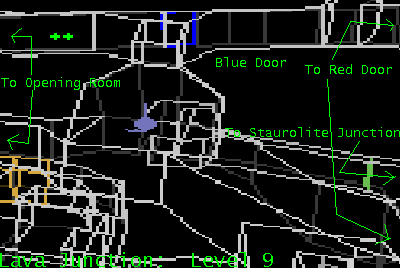
This junction may be accessed by the lower middle fork from the opening
room. This area is crucial since many of the keys and doors are nearby
this area.
Before you can enter this junction by the middle fork, you will usually
have to fight a cloaked Medium Lifter.
If you take the passageway up, you may access the corridor containing
the blue door.
Another passage indicated leads to one of the three red doors in this
level.
There is a passage leading to Staurolite Junction. It is fairly obscure,
since it is rather low. Staurolite Junction will be discussed later.
Staurolite Junction

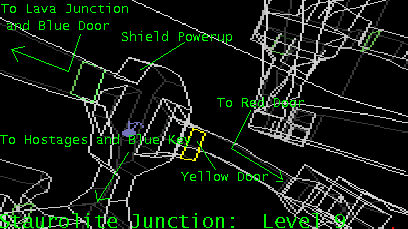
I call this room Staurolite Junction because it looks like a twinned
staurolite crystal(which is renowned for its resemblance to a cross). This
area is important since you must get two keys from this area.
If you enter the junction from Lava Junction, going straight ahead leads
you to another of the red doors.
To your right is the yellow door.
To get the blue key from here, go down the hole indicated. The hostages
may also be accessed from the hole.
Hostage Area

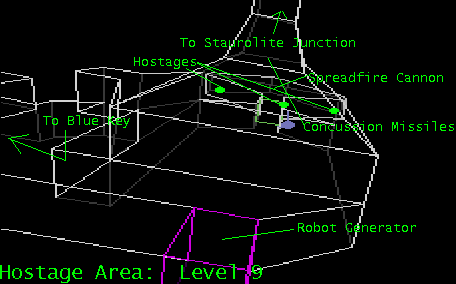
This room is where the hostages are located, but note a dreaded item
in this room.
The item is a robot generator. This generator will activate when you
enter the room and will produce Secondary Lifters and Spider Processing
Robots. You may want to circle the room and destroy them as they come into
your sights.
Once you have all the enemies destroyed, rescue the hostages. If you
do not have possession of the Spreadfire Cannon, you may grab it in the
hostage cell.
Once you leave the hostage cell, hurry to the corridor indicated and
destroy the Medium Hulk guarding the door, which will lead you to the blue
key.
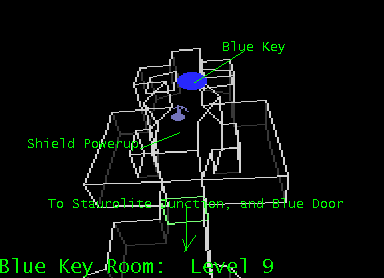
Blue Key Room

The blue key is guarded by several Secondary Lifters and two cloaked
Medium Lifters. You should destroy them before grabbing the key.
There is a shield powerup located in this room.
The two cloaked Medium Lifters usually lurk to the sides of the room
and attack from your blind side. Beware of their approach.
You will have to return to Staurolite Junction in order to access Lava
Junction to access the blue door.
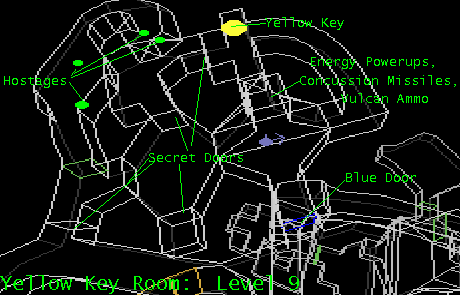
Yellow Key Room

The yellow key is guarded by a Super Hulk and a Medium Hulk. You should
destroy both robots before attempting to get the key.
There are many secret doors in this area. If you look to the top of
the room when you first enter, you will see some powerups.
Go to the secret door to your left and you will enter a chamber with
three more secret doors. Do not open the secret door that is closest to
the main corridor...it contains a swarm of Spider Drones. The secret door
to your right leads to another secret door leading to the yellow key. The
secret door in front of you leads to another hostage cell door.
You will have to return to Staurolite Junction to access the Yellow
door.
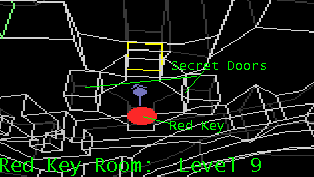
Red Key Room

The key looks unattended...smells fishy.
If you are thinking that when you enter the room, you are right. This
room is a trap. Once you enter the vicinity of the secret doors, the doors
will open revealing a swarm of Spider Drones and Secondary Lifters. You
will have to destroy in order to grab the key and get out of the room.
There are three red doors in the level. One may be accessed via Staurolite
Junction. Another may be accessed via Lava Junction.
The third may be accessed by taking the right fork from the opening
room.
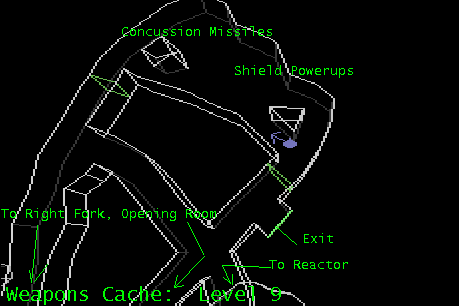
Weapons Cache
 |
This area may be accessed by taking the right fork from the opening
room. This is a cache of missiles and shield powerups. It is guarded by
a Spider Processing Robot and some Class 1 Drones.
The reason this area is emphasized is because the exit is located in
this area. As may be noted, the exit is VERY distant from the reactor
room, and must be ascertained before attempting to attack the reactor.
|
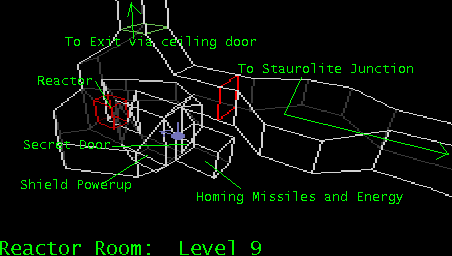
Reactor Room

If you are entering the reactor room via Staurolite Junction, you will
come under immediate attack by Spider Processing Robots. Destroy it and
any drones that it releases.
If you are entering this area via Lava Junction or the right fork from
the opening room, you will have to destroy the Super Hulk lurking around
and pick up the smart missile located in a chamber behind it before entering
the actual reactor room.
Once you have destroyed any enemies outside the room, enter the room
and attack the Spider Processing Robot. Destroy it and head down into the
room, avoiding the concussion missiles flying toward you.
The reactor is guarded by two Medium Hulks, which should be destroyed
before attacking the reactor.
There is a shield powerup located in a recession in the floor, and some
homing missiles and energy powerups located in a secret chamber.
The reactor is sandwiched between two pillars.
When you have blown the reactor, go to the ceiling door FAST!!! Once
you enter the room where the Super Hulk is located, open the red door in
the ceiling and keep going until you reach the weapons cache and the exit.
| Previous Level - Level 8: Mars Processing
Station |
Current Level - Level 9: Mars Military Dig |
Next Level - Level 10: Mars Military Base |
 |
 |
 |
